
Short description
This article explains how to run a make-up exam with Classtime and how to proceed when students were absent on the original exam date.
Depending on whether you run the exam with or without a verified student login, you'll find the matching instructions below.
With verified login
1. Activate the session and configure settings
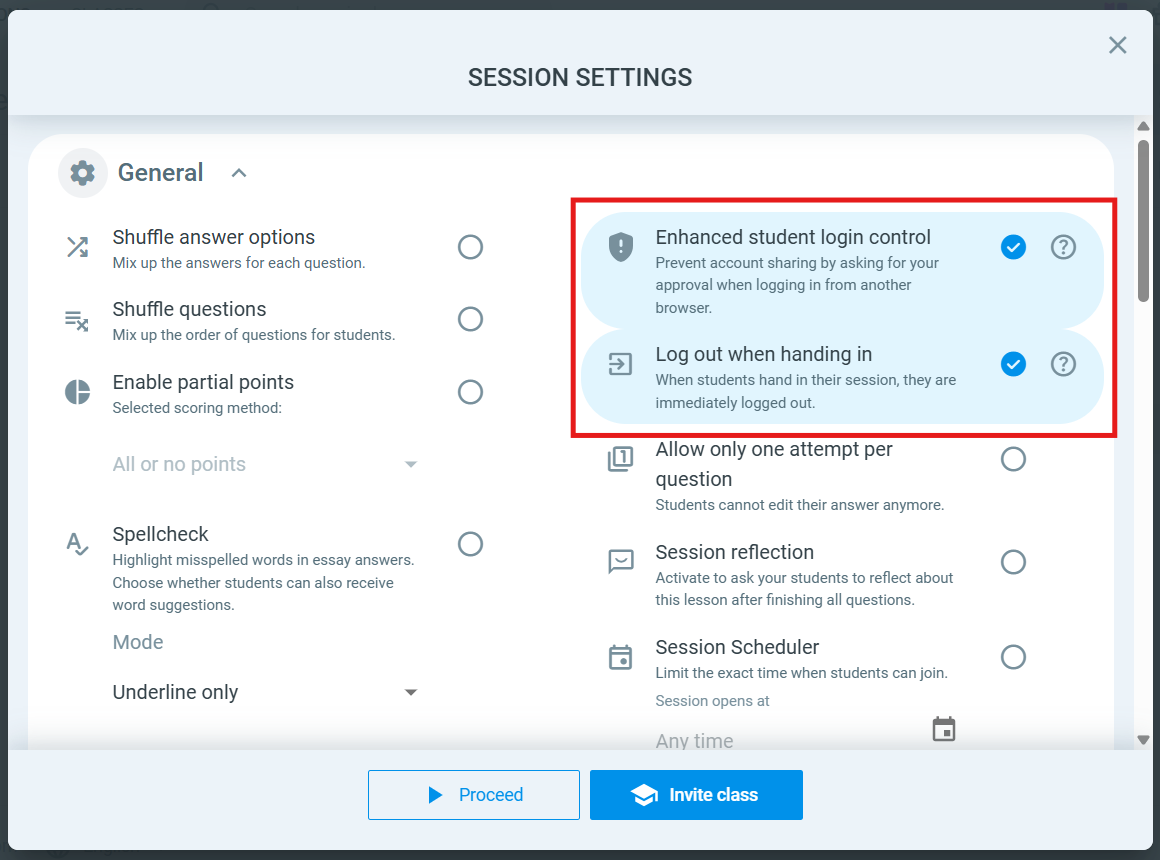
Activate the session and set up your desired settings. We additionally recommend the following two settings:
Log out when students submit the session: As soon as a student hands in the session, they are automatically logged out. After that, they can not view or edit the session. It will still appear under completed sessions in the Student Portal, but it cannot be opened. Note: If you end the session and enable the PDF view, the session will be visible to students in the PDF.
Advanced student login control: If a student tries to log in again or additionally via a different browser, you must manually approve that access first.
2. Remove absent students from the dashboard
If you invited the class, all names will appear in the dashboard. Here's how to remove absent students:
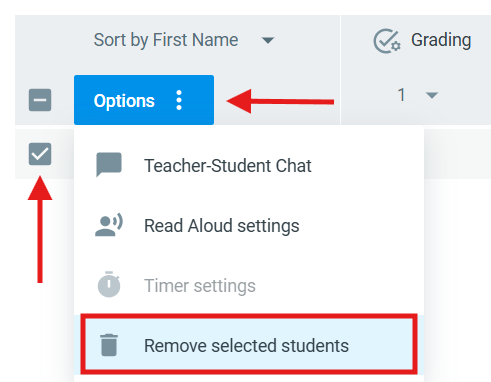
On the left side of the dashboard, check the box next to the absent students.
Select "Remove students" from the options at the top.
Removed students cannot take part in the session. They will be listed at the bottom of the dashboard under "Removed participants".
3. Run the exam
Before ending the session, make sure that all present students have submitted their answers. A completed submission is indicated by a double checkmark next to the student's name in the dashboard.
Afterwards, pause, disable, or end the session as usual.
4. Run the make-up exam
On the make-up exam date:
Reactivate the session.
Scroll down in the dashboard to "Removed participants" and add back the relevant students.
Share the session code with the students taking the make-up exam.
Run the exam and end the session.
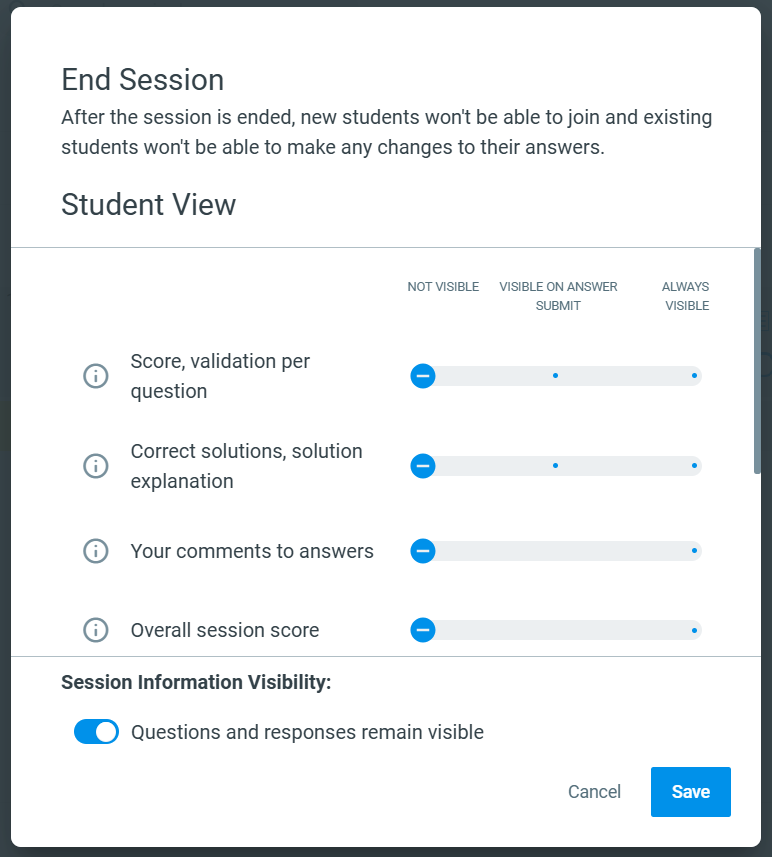
Set up the student view settings to define what students should be able to see afterwards.
5. Grade the exam and release the results
If you want to make the exam results visible to students in the portal after grading:
Open the general session settings in the top left of the dashboard and disable the following (the session does not need to be reactivated for this):
"Log out when students submit the session"
"Advanced student login control"
Safe Exam Browser (if used)
Note: If you want to display a grade, first select the grade table in the dashboard, then enable the grade display in the student view settings.
Without verified login
1. Activate the session and configure settings
Activate the desired settings. We recommend the "Advanced student login control": if a student tries to log in via a different browser, you must manually approve that access first.
2. Share the session code and run the exam
Share the session code, QR code, or link with the students who are present.
Make sure that all students have fully submitted their answers. A completed submission is indicated by a double checkmark next to the student's name in the dashboard.
3. Pause or end the session
You can pause the session, disable all questions, or end the session directly. In all three cases, students will no longer have access to the content.
4. Run the make-up exam
Reactivate the session on the make-up exam date and share the session code with the students taking the make-up exam. Run the exam and then end the session. You will now be prompted to adjust the student view settings accordingly.
5. Share the results
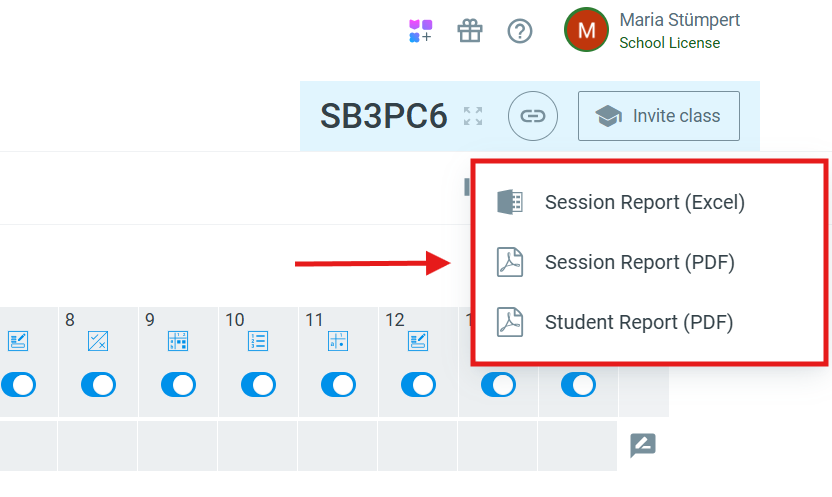
Since no user accounts are linked when logging in without verification, results cannot be displayed directly in the Student Portal. However, you can export the grading/results as a PDF and hand them out. What is visible depends on your student view settings (see above).
Important note on submission
Students must click "Answer" on every question so that their input is saved. When submitting the final exam, they will be alerted if there are still drafts or unanswered questions. Therefore, remind students before the exam to carefully answer and submit all questions.
Related articles
FAQ
Can a student still change an answer after clicking "Answer"?
Yes, the option "Change answer" appears below the answer field. This is available as long as the session setting "Only one attempt per question" is not enabled.
Why is submitting so important?
When students click "Submit," they are alerted to any drafts and to questions that haven't been answered yet. This helps you avoid problems with missing answers. In addition, it protects against students reworking the exam after the session is reactivated, since this must first be manually approved by you. This is especially relevant if the setting "Log out as soon as students submit the session" is disabled.